

How to Make a Heat Lamp at Home: DIY Guide, Materials, Steps, and Safety Tips
This post contains affiliate links. I may earn a small commission from purchases made through them, at no extra cost to you. As an Amazon Associate, I earn from qualifying purchases.
A homemade heat lamp can be a useful DIY solution when you need a small heating source for areas such as animal spaces, workshops, or cold environments. The basic idea behind this project is simple: combine a suitable heat-producing bulb with a proper lamp fixture that can safely handle high temperatures.
The DIY guides and discussions around homemade heat lamps mainly focus on selecting the right components, installing them correctly, and ensuring safe placement. A common setup uses a 250-watt infrared heat bulb with a compatible clamp-style lamp fixture.
Before building one, understanding the parts, measurements, and safety requirements helps create a more reliable setup.
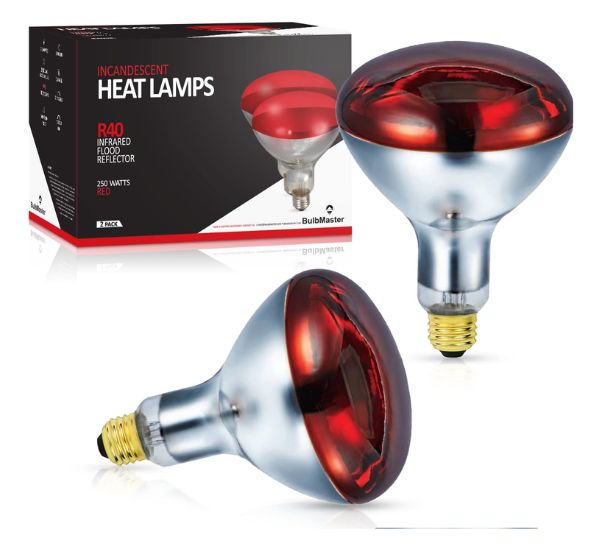
Materials Needed to Build a Homemade Heat Lamp
A basic DIY heat lamp requires a few important components. The exact design can vary depending on the purpose, but the common materials include:
| Material | Purpose |
|---|---|
| Heat lamp bulb | Produces infrared heat |
| Reflective clamp fixture | Holds and directs the bulb |
| Lamp socket | Connects bulb with electrical supply |
| Extension cord | Provides power connection |
| Reflector cover | Helps direct heat |
| Mounting support | Keeps the lamp stable |
| Cleaning cloth | Removes dust from bulb before use |
A frequently used combination is a 250-watt infrared bulb with a clamp reflective fixture designed for heat applications.
Tools Required for the DIY Setup
Depending on the design, you may need:
- Screwdriver
- Drill
- Mounting screws
- Wire or fasteners
- Protective gloves
- Cleaning cloth
Some portable designs also use additional support materials such as a wooden base, wheels, or hanging hardware for stability.
Step-by-Step Guide to Make a Heat Lamp
1. Choose the Correct Heat Bulb
The first step is selecting a bulb designed to produce heat.
A common option used in DIY projects is:
- 250-watt infrared heat bulb
- Heat lamp or brooder-style bulb
- Compatible lamp socket
The bulb should match the fixture rating. Using a bulb with higher power than the fixture supports can create safety problems.
2. Prepare the Lamp Fixture
A reflective clamp lamp is commonly used because it can hold the bulb and direct heat toward the required area.
Steps:
- Check that the fixture is clean.
- Confirm the socket supports the bulb wattage.
- Inspect the cord and plug before connecting power.
3. Clean the Bulb Before Installation
Dust and debris on a heat bulb can affect performance.
Recommended steps:
- Wipe the bulb surface carefully.
- Allow it to dry for around 10 minutes.
- Install it gently into the socket.
Avoid tightening the bulb too much because excessive pressure can damage the glass.
4. Install the Bulb Into the Fixture
Carefully screw the bulb into the lamp holder.
Important points:
- Keep the bulb secure.
- Do not force installation.
- Make sure the fixture is stable.
- Keep electrical connections protected.
5. Position the Heat Lamp Correctly
Placement affects both heating performance and safety.
Consider:
- Keeping the lamp away from flammable materials.
- Ensuring animals or people cannot touch the hot bulb.
- Providing enough space around the fixture.
Some setups use hanging arrangements or mounting supports to maintain a safe position.
Common Heat Lamp Setup Measurements and Numbers
Numbers are important when creating a DIY heat lamp because wattage, distance, and operating time affect performance.
| Item | Measurement / Number |
|---|---|
| Common bulb power | 250 watts |
| Bulb type | Infrared heat bulb |
| Drying time after cleaning bulb | 10 minutes |
| Example outdoor placement height | 5–6 feet |
| Battery operation example | 24 hours |
| Lamp discussion years found | 2007, 2016, 2021 |
| Lampity article date | January 17, 2024 |
Using a Heat Lamp for Chickens and Small Animals
One common use of homemade heat lamps is keeping young animals warm.
Many poultry owners use heat lamps for:
- Baby chicks
- Chicken brooders
- Small animal areas
A frequently discussed setup uses a 250-watt bulb to provide warmth during colder conditions.
When using a lamp around animals:
- Make sure the lamp is firmly secured.
- Keep cords protected.
- Monitor the heat level.
- Avoid direct contact with bedding or flammable items.
DIY Heat Lamp Safety Checklist
A homemade heat lamp produces high temperatures, so safety should be the first priority.
| Safety Check | Why It Matters |
|---|---|
| Use the correct bulb rating | Prevents fixture overload |
| Secure the lamp properly | Reduces falling risks |
| Keep away from fabric and wood | Reduces fire hazards |
| Check cords regularly | Prevents electrical problems |
| Allow cooling before handling | Prevents burns |
Heat bulbs can become extremely hot, so the lamp should always be installed in a safe location.
Advantages of Making a Heat Lamp at Home
A DIY heat lamp can provide several benefits:
Affordable Setup
Using basic components can be less expensive than purchasing specialized heating equipment.
Custom Placement
You can adjust the lamp position depending on your space.
Multiple Uses
A homemade heat lamp can be used for:
- Small animal warming
- Cold workspace areas
- DIY heating projects
Easy Maintenance
Replacing a bulb or checking the fixture is usually simple.
Common Mistakes to Avoid
Many DIY users make mistakes when building heat lamps.
Avoid these problems:
- Using a bulb that exceeds fixture capacity.
- Hanging the lamp too close to materials.
- Leaving cords exposed.
- Ignoring heat buildup.
- Using damaged electrical parts.
A safe design depends on proper installation and regular checking.
(FAQs)
Can I make a heat lamp with a normal bulb?
A normal light bulb is not designed mainly for heat production. Heat lamps typically use infrared bulbs made specifically for producing warmth.
What watt bulb is commonly used for a homemade heat lamp?
A 250-watt infrared heat bulb is one of the commonly used options in DIY heat lamp setups.
How long should a heat lamp run?
The operating time depends on the purpose and environment. Some animal warming discussions mention setups running for 24 hours, but monitoring temperature and safety is important.
Can I use a heat lamp for baby chicks?
Yes, heat lamps are commonly discussed for warming baby chicks. The lamp should always be positioned safely and checked regularly.
How far should a heat lamp be placed?
The distance depends on the bulb power, setup, and heating requirement. The lamp should be positioned so the area receives enough warmth without creating overheating risks.
Is making a homemade heat lamp safe?
A DIY heat lamp can be used safely when the correct bulb, fixture, wiring, and placement methods are followed. Always treat the bulb and fixture as high-temperature equipment.
Final Thoughts
Making a heat lamp at home is a simple DIY project when you understand the required parts and safety requirements. A basic setup usually includes a 250-watt infrared bulb, a suitable fixture, and a secure mounting method.
The most important part of this project is not only creating heat but controlling it safely. Proper installation, correct measurements, and regular inspection help make a homemade heat lamp more useful and reliable.

Dylan
Dylan is a lighting enthusiast and experienced content creator with 7 years of expertise in blogging about home improvement, lighting solutions, and modern illumination trends. As the lead writer for BrightLightZone, Dylan focuses on simplifying complex lighting topics and helping readers discover practical, energy-efficient, and innovative lighting ideas for their homes and spaces.
With a passion for exploring the latest advancements in LED technology, smart lighting, and DIY lighting solutions, Dylan combines research, creativity, and real-world insights to create helpful guides for homeowners, DIY enthusiasts, and lighting lovers. Through BrightLightZone, Dylan aims to inspire people to transform their environments with smarter, brighter, and more sustainable lighting choices.


